Linus Torvalds made Linux in 1991 for fun. It's a free operating system that gives you more control over your computer. The main part, the Linux kernel, helps your computer work smoothly. Different versions of Linux come with special software to make sure everything runs well and stays safe.
Linux is a free and changeable program that lets lots of people work together and come up with new ideas. You can change its code to make it fit exactly what you want it to do.
Advantages of Using Linux
- You can get Linux for free.
- It doesn't get viruses, so it's safe.
- You get support for a long time.
- Works even on low configuration computers.
- You can use Linux from a pen drive without installing it.
- Linux is very small in size.
- Linux has a good way to talk to the computer called the terminal.
- Linux comes with complete driver support; you don't need to find extra drivers to make it work.
- You can change and make it how you want due to its open-source nature.
- You can pick different kinds of Linux to make it look how you want.
- Linux is strong and doesn't break easily.
- It's good at staying safe from bad things compared to other computer systems.
- People who make Linux always make it better and safer.
- It's easy to update without restarting the computer all the time.
- Linux works on many types of computers, so it's useful for different things.
Among the different distros of Linux, today we will go with installing Pop!_OS.
Benefits of Pop!_OS:
User-Friendly GNOME Desktop: Pop!_OS offers a user-friendly interface based on the GNOME desktop environment, making it easy to navigate and use.
Customized User Experience: The OS has a unique look and feel with customized desktop elements like an application launcher and theme.
Hardware Optimization: Pop!_OS is optimized to work seamlessly with System76 hardware, ensuring excellent performance and compatibility.
Pop Shell Tiling: Includes the "Pop Shell" tiling extension for efficient window management, ideal for multitasking.
GPU Switching: Offers GPU switching functionality for laptops with dual GPUs, enhancing power efficiency and performance.
Pros and Cons:
Pros:
- User-friendly interface.
- Customization options.
- Optimized for System76 hardware.
- Efficient window management with tiling.
- GPU switching for improved performance.
Cons:
- Limited support for older hardware.
- Some users may find the customization overwhelming.
- Requires manual installation of NVIDIA drivers for systems with discrete GPUs.
Instructions to Install Pop!_OS:
- System Requirements:
- Any 64-bit x86 processor, whether AMD or Intel
- RAM 4 GB
- Drive Storage 20 GB
- USB Drive 4 GB
Secure Boot
Before installing Pop!_OS, make sure to disable Secure Boot. You can usually disable Secure Boot in the BIOS of most computers, but keep in mind that the steps to disable it may differ depending on the laptop or motherboard model you have.
1. Download Pop!_OS ISO Image: Visit the System76 website or Pop!_OS download page to download the latest version of the ISO image.
2. Create a Bootable USB Drive: Use tools like "Balena Etcher" for Windows, MacOS, Linux or "Rufus" for Windows to create a bootable USB drive from the downloaded ISO image.
2. (a) Download Balena Etcher
2. (b). Insert USB-Drive and open balenaEtcher
2. (c) Click “Flash from file” and select the downloaded .iso file
2. (d) Select the USB Drive by clicking on "Select target"
2. (e) Click “Flash”
3. Boot from USB: Restart your computer and boot from the USB drive by changing the boot order in BIOS/UEFI settings.
Your PC will boot into a live Pop!_OS environment after your bootable USB drive is chosen as the boot device.
4. Select your language:
5. Choose a location.
6. Choose a language for keyboard input.
7. Select a keyboard layout
8. Installation Progress: Monitor the installation progress on-screen as system files are copied and configurations are set up.
For a basic setup, go with "Clean Install." It's ideal for beginners but will wipe your target drive. If you want more options, pick "Custom (Advanced)." This opens up GParted, a tool for advanced customizations like: * Setting up dual boot systems * Creating a separate partition for your home directory (/home) * Moving the temporary storage partition (/tmp) to a different drive
Use Pop!_OS without installation: If you want to browse the internet or explore the Pop__OS without installation, click “Try Demo Mode." Connect to your wifi network, and you are good to go.
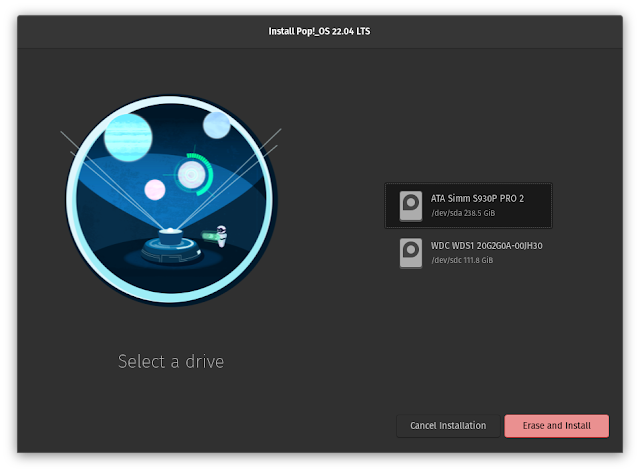
9. Press the "Erase and Install" button to initiate the installation of Pop!_OS on the chosen storage device.
10. User Account : Provide your full name and user name. Username must be in lowercase.
11. Set a password for your Account
12. Entire Disk Encryption
To safeguard personal information in case of unauthorized physical access, encrypting the device's main storage (hard drive) is recommended, though not mandatory.
You have two options:
a. Encrypt using a login password. Select "Encryption password is the same as user account password" to encrypt the drive with your login password.
b. Set a separate password: Uncheck the above option and click "Set Password" at the bottom to create a unique password for encryption.
If you prefer not to encrypt the drive, choose "Don't Encrypt."
When selecting the "Set Password" option, you'll be asked to create an encryption password. This password will be required each time the system starts up.
13. Proceed with the installation process. Pop!_OS will commence the installation on your storage device.
14. Complete Installation: Once installation is complete, remove the USB drive, reboot your system, and log in to your new Pop!_OS environment.
By following these steps, you can successfully install Pop!_OS on your computer and enjoy its user-friendly interface and optimized performance.


0 Comments